Sensors API
The sensors API, added in iViewer 4.0.216, allows applications to access low-level hardware sensors on the device and receive sensor updates. Using the sensor API, you can implement advanced code that detects movements and rotations in three dimensions, know the device's attitude (roll, pitch, yaw), heading relative to true north (compass) and get location information. You determine the rate at which you want to receive sample updates, which can be independent of the rate at which those samples are being collected. This way, you can collect a lot of samples and only process them in chunks.
Since some of sampled data can lead to very high callback rates (depending on the update rate you chose), you may want to use thresholds when configuring the sensors monitor, so that your callback function starts being triggered only when certain threshold values are being reached. This way, you can detect the beginning and end of an acceleration movement (you are guaranteed to be called once more after the acceleration or rotation diminishes below the threshold) and react appropriately.
The sensors may or may not be present on your hardware platform (in particular, on the variety of Android platforms). You can determine whether the device has any of the supported sensors by querying the CF.device.hasSensor object at runtime. For example, if you want to determine whether the device supports a hardware accelerometer, you can use the code below:
if (CF.device.hasSensor[CF.AttitudeSensor]) {
    // Yes, this device has an attitude sensor onboard
}
To start monitoring a sensor, you can use the CF.startMonitoring() function. You can monitor the same sensor multiple times with different parameters, although make sure to not do this permanently with high callback rates, of you could slow down the application to the point where it becomes unusable.
To stop monitoring a sensor, use the CF.stopMonitoring() function, using the monitor ID that was returned to you when you started monitoring the sensor.
Accelerometer
An accelerometer is a hardware sensor that samples acceleration on three axis. Acceleration is expressed in G, the G (gravity force) constant being 9.81 m/s^2.
The accelerometer is identified by CF.AccelerometerSensor.
The options object you pass when starting monitoring the accelerometer sensor can contain the following properties (note that all properties are optional):
xthreshold(Number): the minimal absolute value of acceleration on the X axis that will start triggering callbacks.ythreshold(Number): the minimal absolute value of acceleration on the Y axis that will start triggering callbacks.zthreshold(Number): the minimal absolute value of acceleration on the Z axis that will start triggering callbacks.historySize(Number): every time your callback function is being called, you receive an array with the N last collected data points. The history size is optional, if you don't set one you will receive only the latest data point (faster).captureInterval(Number): the interval, in milliseconds, at which you want data points to be captured. This value is only used if you also specify an history size. In this case, you can ask the software to collect data very frequently, and to report to your callback function less frequently. Minimizing the number of callbacks into JavaScript reduces pressure on the device CPU.reportInterval(Number): the interval, in milliseconds, at which you want your callback function to be called with acceleration data. Note that you should refrain from asking values to be reported too often, or you risk severe congestion in the application as the high frequency of callbacks into JavaScript could slow down the software by a large factor. Additionally, the device's sensor may or may not support high data sampling frequencies. In this case, you would get the same values over several successive data point collections.
If you do specify any of X, Y or Z threshold, your callback function will start being called only when all the aforementioned values are above threshold. When the acceleration slows down to below threshold, your callback function will be called once more to allow you to detect the end of the monitored acceleration, allowing you to take any action necessary.
If you do not specify a historySize, you will receive an array with only one element (the current acceleration). Otherwise, you receive an array with most recent acceleration values first, further elements going back in time up to historySize elements.
The structure of each data capture point is the following:
x(Number): the acceleration on the X axis, in Gy(Number): the acceleration on the Y axis, in Gz(Number): the acceleration on the Z axis, in Gt(Number): the time when this data was captured, as a floating point number with seconds from January 1st, 1970 with millisecond resolution.
Since the hardware may not support fast data sample rate, we highly recommend that you use reasonable values for capture and particularly report intervals. For example, a report every 200ms (5 times a second) with a 20ms capture interval (50 times a second) and historySize of 10 means that you get 10 data sample points 5 times per second, which is fast enough to react to acceleration changes and slow enough to aboid bogging down the device CPU.
In addition, make sure you set threshold values to guarantee that your callback won't be called all the time but only when you need to detect specific device movements.
Gyroscope
A gyroscope is a hardware sensor that samples rotation rate on three axis. Rotation rate is indicated in radians per second. The rotation rate allows you to directly quantify the device's movements, but is very low level. It is not easy to calculate the actual attitude of the device. You may also want to look at the Attitude sensor for more synthetic information.
The gyroscope is identified by CF.GyroscopeSensor.
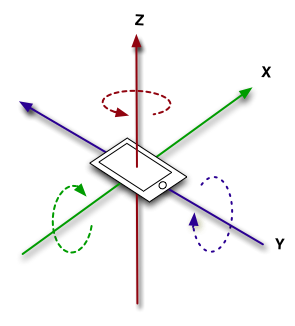
The gyroscope rotation sign follows the right hand rule, as explained by the diagram below: if the right hand is wrapped around the axis such that the tip of the thumb points toward positive values, a positive rotation is one toward the tips of the other four fingers.
The options object you pass when starting monitoring the gyroscope sensor can contain the following properties (note that all properties are optional):
xthreshold(Number): the minimal absolute value of rotation rate on the X axis that will start triggering callbacks.ythreshold(Number): the minimal absolute value of rotation rate on the Y axis that will start triggering callbacks.zthreshold(Number): the minimal absolute value of rotation rate on the Z axis that will start triggering callbacks.historySize(Number): every time your callback function is being called, you receive an array with the N last collected data points. The history size is optional, if you don't set one you will receive only the latest data point (faster).captureInterval(Number): the interval, in milliseconds, at which you want data points to be captured. This value is only used if you also specify an history size. In this case, you can ask the software to collect data very frequently, and to report to your callback function less frequently. Minimizing the number of callbacks into JavaScript reduces pressure on the device CPU.reportInterval(Number): the interval, in milliseconds, at which you want your callback function to be called with rotation rate data. Note that you should refrain from asking values to be reported too often, or you risk severe congestion in the application as the high frequency of callbacks into JavaScript could slow down the software by a large factor. Additionally, the device's sensor may or may not support high data sampling frequencies. In this case, you would get the same values over several successive data point collections.
If you do specify any of X, Y or Z threshold, your callback function will start being called only when all the values for which a threshold was defined are above threshold. When the rotation rate slows down to below threshold, your callback function will be called once more to allow you to detect the end of the monitored acceleration, allowing you to take any action necessary.
If you do not specify an historySize, you will receive an array with only one element (the current rotation rate). Otherwise, you receive an array with most recent rotation rates first, further elements going back in time up to historySize elements.
The structure of each data capture point is the following:
x(Number): the rotation rate on the X axis, in radians/sy(Number): the rotation rate on the Y axis, in radians/sz(Number): the rotation rate on the Z axis, in radians/st(Number): the time when this data was captured, as a floating point number with seconds from January 1st, 1970 with millisecond resolution.
Since the hardware may not support fast data sample rate, we highly recommend that you use reasonable values for capture and particularly report intervals. For example, a report every 200ms (5 times a second) with a 20ms capture interval (50 times a second) and historySize of 10 means that you get 10 data sample points 5 times per second, which is fast enough to react to acceleration changes and slow enough to avoid bogging down the device CPU.
In addition, make sure you set threshold values to guarantee that your callback won't be called all the time but only when you need to detect specific device movements.
Attitude
The device attitude is a composite sensor assembled from hardware sensors information, to give you the devices' roll, pitch and yaw angles (in radians). As with other sensors, you can set thresholds to limit the frequency of reports (only report when the change is over X degrees).
The attitude sensor is identified by CF.AttitudeSensor.
Roll, pitch and yaw are defined as follows:
- Roll is a rotation around an axis that goes from front to back (top to bottom of the screen). Hence, the roll changes with side to side tilting of the device left or right.
- Pitch is a rotation around a lateral axis that passes through the device from side to side. Hence, the pitch changes when the "nose" of the device goes up or down.
- Yaw is a rotation around an axis that goes from above the screen to below the screen, passing through its center. In other words, yaw is equivalent to a compass (but points to magnetic North, not True North).
The options object you pass when starting monitoring the attitude sensor can contain the following properties (note that all properties are optional):
rollThreshold(Number): absolute value of the minimal roll angle change (in radians) that must occur before triggering a callback.pitchThreshold(Number): absolute value of the minimal pitch angle change (in radians) that must occur before triggering a callback.yawThreshold(Number): absolute value of the minimal yaw angle change (in radians) that must occur before triggering a callback.historySize(Number): every time your callback function is being called, you receive an array with the N last collected data points. The history size is optional, if you don't set one you will receive only the latest data point (faster).captureInterval(Number): the interval, in milliseconds, at which you want data points to be captured. This value is only used if you also specify an history size. In this case, you can ask the software to collect data very frequently, and to report to your callback function less frequently. Minimizing the number of callbacks into JavaScript reduces pressure on the device CPU.reportInterval(Number): the interval, in milliseconds, at which you want your callback function to be called with attitude change data. Note that you should refrain from asking values to be reported too often, or you risk severe congestion in the application as the high frequency of callbacks into JavaScript could slow down the software by a large factor. Additionally, the device's sensor may or may not support high data sampling frequencies. In this case, you would get the same values over several successive data point collections.
If you do specify any of roll, pitch or yaw threshold, your callback function will be called only when all the values for which a threshold was defined are above threshold.
If you do not specify an historySize, you will receive an array with only one element (the current attitude). Otherwise, you receive an array with most recent rotation rates first, further elements going back in time up to historySize elements.
The structure of each data capture point is the following:
roll(Number): the roll angle, in radianspitch(Number): the pitch angle, in radiansyaw(Number): the yaw angle, in radians (typically a deviation from the magnetic north)t(Number): the time when this data was captured, as a floating point number with seconds from January 1st, 1970 with millisecond resolution.
Since the hardware may not support fast data sample rate, we highly recommend that you use reasonable values for capture and particularly report intervals. For example, a report every 200ms (5 times a second) with a 20ms capture interval (50 times a second) and historySize of 10 means that you get 10 data sample points 5 times per second, which is fast enough to react to acceleration changes and slow enough to avoid bogging down the device CPU.
In addition, make sure you set threshold values to guarantee that your callback won't be called all the time but only when you need to detect specific device movements.
Heading
The heading sensor is a synthetic version of the magnetometer hardware sensor. It delivers true north heading information, so you can obtain the current heading (relative to the current device orientation, so the heading always indicates where the top of the current page is pointing at). You can specify a threshold to receive heading updates only when a significant change occurred.
The heading sensor is identified by CF.HeadingSensor.
Heading is defined as the heading angle (in degrees) relative to the geographic North Pole. This means that to get a proper heading reading, the device must have its Location feature enabled so it can determine where it is on the globe to provide an accurate reading. A value of 0 points to North, 90 points to East, 180 points to South and 270 points to West. A negative value indicates that the heading could not be determined.
The options object you pass when starting monitoring the heading sensor can contain the following properties (note that all properties are optional):
threshold(Number): the minimum change, in degrees, that must occur since the last report was made to trigger a new report to your code. For example, if you specify 10, you won't get a new heading report unless there is at least 10 degrees difference (in absolute value) since the last time you were called. The minimum threshold enforced by iViewer is 1 degree.historySize(Number): every time your callback function is being called, you receive an array with the N last collected data points. The history size is optional, if you don't set one you will receive only the latest data point (faster).captureInterval(Number): the interval, in milliseconds, at which you want data points to be captured. This value is only used if you also specify an history size. In this case, you can ask the software to collect data very frequently, and to report to your callback function less frequently. Minimizing the number of callbacks into JavaScript reduces pressure on the device CPU.reportInterval(Number): the interval, in milliseconds, at which you want your callback function to be called with attitude change data. Note that you should refrain from asking values to be reported too often, or you risk severe congestion in the application as the high frequency of callbacks into JavaScript could slow down the software by a large factor. Additionally, the device's sensor may or may not support high data sampling frequencies. In this case, you would get the same values over several successive data point collections.
If you do not specify an historySize, you will receive an array with only one element (the current heading). Otherwise, you receive an array with most recent rotation rates first, further elements going back in time up to historySize elements.
The structure of each data capture point is the following:
heading(Number): the current heading relative to true North (see above), in degreest(Number): the time when this data was captured, as a floating point number with seconds from January 1st, 1970 with millisecond resolution.
We highly recommend that you pass a reasonable threshold for the kind of application you are developing, so as to minimize the number of times your code is being called.
Location
The location sensor reports the current location of your device (in GPS coordinates). For this, location must be enabled for iViewer at the device level. On iOS devices, the first time your code uses the Location sensor, the user will be presented a dialog asking whether she authorizes the application to access the location data. If she denies it, the location sensor is disabled and you will never receive an update.
The location sensor is identified by CF.LocationSensor.
The options object you pass when starting monitoring the location sensor can contain the following properties (note that all properties are optional):
historySize(Number): every time your callback function is being called, you receive an array with the N last collected data points. The history size is optional, if you don't set one you will receive only the latest data point (faster).captureInterval(Number): the interval, in milliseconds, at which you want data points to be captured. This value is only used if you also specify an history size. In this case, you can ask the software to collect data very frequently, and to report to your callback function less frequently. Minimizing the number of callbacks into JavaScript reduces pressure on the device CPU.reportInterval(Number): the interval, in milliseconds, at which you want your callback function to be called with attitude change data. Note that you should refrain from asking values to be reported too often, or you risk severe congestion in the application as the high frequency of callbacks into JavaScript could slow down the software by a large factor. Additionally, the device's sensor may or may not support high data sampling frequencies. In this case, you would get the same values over several successive data point collections.
The structure of each data capture point is the following:
lon(Number): the longitude in degrees. Measurements are relative to the zero meridian, with positive values extending east of the meridian and negative values extending west of the meridian.lat(Number): the latitude in degrees. Positive values indicate latitudes north of the equator. Negative values indicate latitudes south of the equator.alt(Number): the altitude, in meters relative to sea level.speed(Number): the instantaneous speed in meters per secondcourse(Number): the direction in which the device is traveling, in degrees from true north. A value of0points to North,90points to East,180points to South and270points to West. A negative value indicates that the course could not be determined.err(Number): the radius of uncertainty for the location, measured in meters. A negative value indicates that the longitude and latitude are invalid.
Contrary to other sensors, there is no threshold for location data. The OS reports new location when it receives updates from the GPS chip, so your code just has to wait for new incoming data.
Example code:
// Monitor the current location and update on-screen text values
// in joins s100 to s106
var locationMonitor = -1;

function startMonitoringLocation() {
    if (locationMonitor !== -1) {
        return;
    }
    locationMonitor = CF.startMonitoring(CF.LocationSensor, {
        historySize: 1 // this is optional, if you don't specify it it defaults to 1
    }, function(sensor, data) {
        CF.setJoins([
            { join: "s100", value: data[0].lon },
            { join: "s101", value: data[0].lat },
            { join: "s102", value: data[0].alt + "m" },
            { join: "s103", value: data[0].speed + " m/s" },
            { join: "s104", value: data[0].course + "°" },
            { join: "s105", value: data[0].err },
            { join: "s106", value: data.length }
        ]);
    });
}

function stopMonitoringLocation() {
    if (locationMonitor !== -1) {
        CF.stopMonitoring(locationMonitor);
        locationMonitor = -1;
    }
}
Constants
CF.AccelerometerSensoris the constant associated with the raw hardware accelerometer on device, if available.CF.GyroscopeSensoris the constant associated with the raw hardware gyroscope on device, if available.CF.AttitudeSensoris the constant associated with the synthetic attitude sensor, if available.CF.HeadingSensoris the constant associated with the synthetic heading (true north) sensor, if available.CF.LocationSensoris the constant associated with the location sensor (GPS coordinates), if available.
Functions
CF.startMonitoring(sensor,options,callback)
Start monitoring a sensor (for example, CF.Accelerometer). You can pass an object with options, depending on the type of sensor you want to monitor:
- See Accelerometer information for accelerometer monitoring options
- See Gyroscope information for gyroscope monitoring options
The function returns a monitor ID that you can use later to stop monitoring the sensor.
Your callback function will be of the type:
function mySensorCallback(sensorType, data) {
    // sensorType is for example CF.Accelerometer
    // data is an object with properties defined by the type of sensor you are monitoring
}
Example of use:
// Monitor the gyroscope sensor. Gather data points every 20ms (50 times per second)
// but only callback into JavaScript every 200ms (5 times per second) which is enough
// to react to detected movements in many cases
var gyroMonitor = CF.startMonitoring(CF.Gyroscope, {
    historySize: 50,
    captureInterval: 20,
    reportInterval: 200
}, function(sensorType, data) {
    // each entry in the data array is an object with x,y and z rotation rates
    // captured at one point in time, plus a t member that gives the capture time
    // most recent entries come first
    var i, len = data.len;
    for (i = 0; i < len; i++) {
        var dataPoint = data[i];
        // ... process your data here ...
    }
});
CF.stopMonitoring(monitorID)
Stop monitoring a particular sensor that was started using CF.startMonitoring(). Typically, you will monitor a particular sensor while in a specific page or situation, and you will stop monitoring it once you don't need it anymore (for example, when the user changes page).
Example:
// Stop monitoring the gyroscope sensor (see the CF.startMonitoring code example)
CF.stopMonitoring(gyroMonitor);